Pages

Thursday, August 28, 2014

DIY DOOR MONOGRAM - FOR THE LITTLES

Is it just my child that hoards "treasures"? Maybe hoarding is genetic, because he definitely gets it from me! Ari has a drawerful of little trinkets and toys that he doesn't play with all the time. Marbles, matchbox cars, "magic rocks"...they're all of course choking hazards for Max, so I decided to hot glue them into infinity. It's an easy way to personalize Ari's space in our rental and only $2 to make. Oh how I miss Ari's room in our old house. Dreaming about our new space we're building!
Click here for my holiday version of the monogram door hanger. Totally reusing it this winter!
STUFF YOU NEED: Glue gun, x-acto knife, pencil, ruler, string, paper mache letter (I got mine at my craft store for $3, but obviously I had a coupon for it!), and junk treasures.
 STEP 1: Measure 1 cm around the inside of the letter.

 STEP 2: Using your ruler to stabilize your knife, cut along the pencil line. Tip: score first, then cut without moving your ruler. It took me about 3 cuts to get all the way through the cardboard.
 STEP 3: Remove top and inside stuff, smooth down the edges of what you cut.
STEP 4: Using your x-acto knife, make holes at the top of the letter and use your pencil to make the holes a little bigger. Thread string through.
 STEP 5: Lay your treasures out to make them fit, then glue glue glue!
STEP 6: Hang up and be proud of your $2 craft!

STEP 7: Roll your eyes as your kid claims he wants to play with the toys you just glued even though he hasn't played with them for months. 

-L


Tuesday, August 26, 2014

OPEN SHELVING: STYLED


Hey friends! How was your weekend? My daughter and I hit the road this weekend with my husband, and although we traveled to an extremely ( miserably) hot place, I was just happy to not have to have our little family separated for those two days. I don't get to travel with him often.... well, like ever actually. So, I usually jump at the chance when there is room on the bus for me and the little.

It has been a pretty quiet Monday for us. We are tying up ALL loose ends on this kitchen this week, and we truly are almost done. I know I have been claiming that for a while now. When you are doing all of the work yourself while juggling a toddler and life in general, it all goes sooooo much slower than you could have ever planned. I am not complaining though! 

I took some time today (nap time) to finally style the open shelving in my kitchen. Up til now, I have just been accumulating dishes and throwing things up there without actually arranging and putting the final touches on everything. I knew I wanted lots of neutrals, with maybe a touch or two of color. 

I moved my rubber spatulas to a vase near my mixer for easy access while prepping baked goods. I am just faking it really, but I love the way it looks to have a little "baking station"

Most of my big plates were in the dishwasher when I shot these photos... oops! I found these recycled water glasses from a local general store here in Nashville called Whites Mercantile. It is a must visit if you are ever in town!
 I finally framed a water color print that I made LAST Thanksgiving.....oh, for our VERY FIRST post. Crazy!!
 Unfortunately, the colors and designs of some of my cookbooks that I love did not go with my kitchen color palette. I took off the cover to my Joy of Cooking book, which had bright red and navy on it, and it revealed this beautiful white and gold perfection! Then, I wrapped another cookbook of mine (which was bright yellow) in a charcoal floral wrapping paper. The three books look a little more cohesive sitting up there now.

Wednesday, August 13, 2014

BEAUTY OBSESSIONS

I wanted to share my favorite (MUST HAVE) beauty products right now! My budget is limited.... I don't wear makeup everyday, so I find it hard to splurge on a ton of beauty products just to try! I am the girl that will return the $8 mascara to Target if I didn't like it. To be honest, I scour beauty aisles whenever I am out shopping, and there are just too many new and fun products to try and not return the things that don't work for you. 

My actual claim to fame just normal, average, everyday life is that I am a licensed esthetician. I love talking about skincare and I would never tell anyone to try something that I personally didn't try or like for myself. So, with that being said, here are my top beauty obsessions now. ALL of these products make me feel beautiful and feminine. They feel luxurious, but don't have a hefty price tag. I can certainly get with that!


gel nail kit - Leah and I have both tried this, and we love it. I hate the price of a gel mani and the use of the harmful rays used to dry your nails. This kit totally gives you a gorgeous shine and makes your nail bed look thicker and healthier. It lasts an easy 5-7 days (depending on how much time you spend doing dishes) :)

simple wipes - I have really fallen in love with the Simple line. I also use the face wash for quick makeup removal. It is all so gentle on my skin, and its a plus that there are less harsh chemicals than in other products. I prefer these wipes over their exfoliating wipes! I use them every night before bed.

 fructis oil - I LOVE the smell of this stuff......oh so much! I apply is before drying my hair, and I get a sleeker softer look.
loreal blush - so pretty, so soft, reminiscent of a facial primer.

eyelid primer - I will try anything for a buck! e.l.f. actually will surprise you! I grabbed this primer in a pinch, and haven't felt the need to spend the money to replenish my Urban Decay primer that I usually use.

toothpaste - I have actually noticed a solid difference in the whiteness of my teeth. I have only been using this for about two weeks, and it has not bothered my sensitive teeth one bit. Loving it!You can actually go to their site HERE and get a coupon for your purchase!

 lip balm - Ok, this is the ONLY item not found at a drugstore. oops! I purchased mine at Anthropolgie. Who doesn't want to pull this beautiful container out of their handbag? So smooth and gives my lips a perfect summer dewy look.

suave hair care - Just try it! Love love love it! If you are a salon shampoo buyer, I challenge you to try this. Also, it smells amaaaaazing!

I would LOVE to know what some of your favorites are right now!! Got any you would like to share? pretty please?

-J

Friday, August 8, 2014

GUIDE TO ROAD TRIPPING WITH LITTLES

Every summer, our family vacations at our lake house in Northern Michigan. It's our little slice of heaven. The problem? It's sort of hard to get to. Flights are expensive, and we somehow miss our connection all. the. time. So this year, we drove! My husband was at Lollapalooza, so I was in the car by myself one day, then my parents drove my oldest the second day. It went really smoothly, so I wanted to share... any mamas out there getting ready to hit the road with littles? 

1. ORGANIZE. Organize the crap out of your car.
Back seat: 
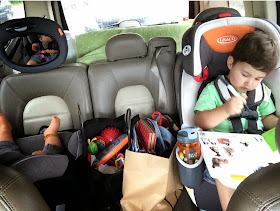
*Structured tote bags (so they don't flip flop all over the place) of toys for each kiddo in reach of their car seats- more on this later...
*Blankets for nap time
*Hats and sunglasses (and lather your kids with sunscreen before you start- learn from my mistakes)
*These window shades- they just adhere to the window! No sticky residue, no suction cups. Love. 
*Cooler and snack bag

Front seat: 
*Large box of baby wipes
*Diapers and changing pad
*used plastic bags to be used as trash bags or wet/dirty clothes
*Phone charger
*CD's (Harry Potter audio books obvs)
*Secret grownup snacks

Trunk:
If you're spending the night half way like we did, pack the stuff you'll need at the hotel last for easy access. I packed each of our jammies, toiletries, and clothes for the next day all in one bag, so I wouldn't have to search through each suitcase in the hotel. 


2. KEEP 'EM BUSY
First thing to note... I don't have a DVD player in my car. Soooooo if you do, you're probably all set. But if you don't, read on. In each kid's tote bags, I brought age appropriate toys for each. Max is 9 months, so he gets bored easily with toys. I just packed a ton of little things I could hand him as he tossed them out of his seat when he was done. Ha! Ari is 3 1/2 and is able to really concentrate for a while. I had him go through all of his activities before playing with the iPad.

We also played a lot of games like I spy, car bingo, cloud shape-spotting, etc. 

Here are Ari's picks for iPad apps. I'd love to know yours! 
Comment below if I'm missing some of your favs. 


3. SNACKS. So many snacks.
I'd love to say I packed little ziplocks of fresh fruit and veggies for my kids... but at least I thought about it! Since Max is still too little for most snacks, I love to give him Mum-Mums- I can just hand him one from the front seat, and he can eat it all by himself. Ari is a snack monster and very food motivated, so I have healthy snacks but also "special treats" for milestones in the trip. In the front seat were secret grownup snacks as MY special treats. Anything crunchy and constant is a good way to keep busy (and stay awake). Oh and caffeine. Duh.


4. SCHEDULE + PIT STOPS
If you're able to, schedule your drive around your kids' nap times. Start an hour or two before nap time so the nap essentially breaks up the trip. I love to drive in the evening, so we can get some driving done when the kids are sleeping. 

Think about when your kids eat meals. Eating in the car takes up a good chunk of time for activities on the drive. Stopping to grab food for the car is a great time for potty breaks! Ugh. My first road trip with a non-diapered kid! We practiced a couple weeks before "holding it in" and it went pretty smoothly. I planned on stopping every few hours to pee, stretch, etc. 

On that note... when you stop, make sure to get your kids' wiggles out! I make up a game with Ari which essentially has him running sprints and doing jumping jacks! I'm that mom in the back of Burger King. You gotta do what you gotta do. 

Since we were driving in Northern Michigan, we were lucky enough to stop in some cute little towns on the bay. The perfect time to Yelp some restuarants. Found this little gem in South Haven. You know I loooove donuts! Excellent coffee at Julia's too. 

Worth it!

I hope your trip goes smoothly- as smoothly as it can be of course. 
And the most important things to take away from this are: 
1. wear stretchy pants
2. cut yourself and your kids some slack
3. try to make it fun! 

What are your tricks of the trade for travel? 

-L


Monday, August 4, 2014

FEATURED PARTY: NOAH'S ARK 2 X 2 BIRTHDAY PARTY

We're so excited to feature the cutest birthday party for twinsies you ever did see! Noah's Ark Two-By-Two, a perfect birthday theme for twins, right?! Laura is super crafty and lucky for us, a Love & Lion reader. She used ideas from Ari's animal themed party and took it to the next level! We love all the little details Laura put into her girls' party to make it extra special. What a good mommy she is! We can't imagine having twins... this lady makes every day special for her girls, and documents it on her instagram and blog here. Audrey and Evangeline are two lucky (and gorgeous) ladies!
 Laura painted an inexpensive tray with chalkboard paint and added these fun gold animal magnets. "Judgement Day Mimosas" are obviously our fav detail! Ha!
Audrey and Evangeline eating their rainbow cake like little ladies! For the hats, spray paint plastic animals gold, cut in half, and glue. More animal hats and other party decor here
Sipping "flood water" aka blue juice, through animal straws. Laura spray painted plastic animals then drilled a hole for the straw topper.
So simple. So cute. Why didn't we think of this? 
The party invitations were on the back of the animal masks, and Laura asked guests to wear it to the party. She had 2 of each mask... two-by-two. Genius. Laura simply drew a rainbow in chalk for the photo booth backdrop.
Outdoor activities included crayon-covered tables, baby pools, balloons, bubble machines, play dough with animal cutters, chalk, and lots of cookie eating!
Menu:
ham sliders, rainbow fruit kabobs, rainbow cake, rainbow cookies, animal crackers, animal gummy kabobs, rainbow goldfish, orange/grapefruit "judgement day" mimosas, coffee, "flood water" blue juice

Sources: 
Dollar Store: napkins, animal plates, crazy straws, trays, kraft paper for coloring tables, pink sparkle candles, plastic animals, noah book party favors, bubbles, chalk
Target: mask invitations, hats, labels, cups
Michaels: plastic animals, spray paint

For more pictures, details, and a fabulous blog about being a mommy of twins, visit Laura's blog,
  The Anderson Family Storybook. Thanks Laura!! You're the best!

Friday, August 1, 2014

CAKE DECORATING PARTY


Today, we are "flashing back" to an absolutely perfect cake decorating party! My dear friend, Sally, threw her daughter, Kate, a sweet (pun very much intended) soiree for her birthday. Sally is so creative, thoughtful and just plain fun! She thought of all of the little details without over doing it, which we can TOTALLY appreciate. As a matter of fact, Leah and I were just talking about how inspirational a photo of a simple banner, cute cake topper, and a beautifully wrapped gift are to us. We definitely love a big party with details that most people may not even notice, but it really is about the few simple touches that can really make a party. That is how we feel about this party...... simplicity makes it stunning.

Sally's garage is party play area.... part garage. She decided to decorate a small space in there to accommodate a few party guests. Icing + Kids can equal a bit of a mess, so it made sense. We just adore Sally's love of color and pattern.

 Something about this tray of icing tubes makes us smile!

Sally embroidered the name of each guest onto their own personal apron.

Don't you want to just lick eat every. single. cupcake?

Milk glasses with colorful striped straws never get old.


Thanks for sharing this with us Sally!! I know you had just as much fun as those kids. 
Happy Friday everyone.... we sure are ready for the weekend!