Pages

Wednesday, January 28, 2015

BABY BOY NURSERY + VALENTINE GIVEAWAY (GIVEAWAY CLOSED)

My husband and I literally just dreamt up what we would like to see in our baby boy's nursery a few days ago. We are in the process of getting our house ready to put on the market possibly, and since we are going through and taking things down, painting everything neutral and not really taking too many risks decor wise, I felt like I had NO freedom to do what I really wanted to do. 

It has actually occurred to me that what I love fits right in with our neutral colors and my husband's ban on wallpaper. I love the idea of a woodland/under the stars kind of feel in the room. I also put my own personal ban on the use of gold..... silver tones have been calling my name.

My husband brought home a print that he picked up when he was traveling ( the Wonder print), so I kind of just started there. I love that he picked something out on his own and brought it home ;).
mobile / zinc monogram - Michael's craft store / wonder print / moon print / giraffe / lamp / crib
arrows - found on etsy, but no longer available, so on the search for something similar / rug / accent table / dresser / ottoman / industrial bins


GIVEAWAY....
ALSO...... WE WANT TO SPREAD THE LOVE!! Leah and I are giving away goods from our Valentine's Day party from this post. A party in a box if you will! Then, you can host your own little breakfast/ Valentine decorating soiree for your little and their friends!
Comment below and tell us your favorite Valentine's Day memory or tradition. That. is. it! The box contains the following items:

- 2 mini mailing tubes (purchased at Michaels if you want to add more)
- custom mailing labels
- 4 children's plates
- 8 red and white heart napkins
- 6 pink striped cups
- 4 hand painted mini scoops
- 8 mini ice cream cups (used for cereal)
- 6 paper straws with mini pink hearts
- "You've got Mail" banner
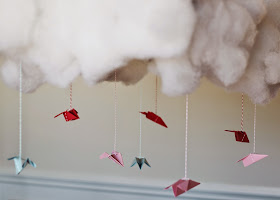
- 8 mini paper airplanes on twine
- fiber fill for clouds
- 3 handmade heart "globes"

Amanda!! You are our winner! Thanks for entering everyone! 
xo
                       

Friday, January 23, 2015

SUPER BOWL PARTY

Who's hosting Super Bowl this year? We picked up the bulk of the decor from Home Depot of all places! This post is not sponsored... I literally walked in and happened to find most of what we needed for the party there! Who knew? We are talking SIMPLE, people. Simple with a big impact!
The table runner is astroturf carpet from Home Depot! They just cut me a strip of 1' x 12' for around $6. The dude was like, "well that's a first for me"! I thought it would be fun to put a signature drink inside a Gatorade cooler like in a real game. 
For the table decor, it's just butcher paper (again, got a huge roll from Home Depot) and drew x's and o's with a Sharpie... my husband had to tell me what those meant. 
You know when you have a ton of people over, they sit their cups down and don't know which is which? Instead of writing names, have each guest have their own "jersey number". I used my silhouette and label paper only so I didn't have to take a trip to the craft store, but most stores have those sticker numbers you could put on the cups. If you're rooting for a team, get cups in your team's colors and use real player jersey numbers!
Pennant banner is just cut out of the same butcher paper roll and handwritten with a Sharpie, taped up with washi tape.
Perfect plates from Target! No need to get football themed everything.
Good luck, hostesses with the mostesses! Gooooo team!

-L

Tuesday, January 20, 2015

VALENTINES DAY BREAKFAST AND CRAFTING FOR LITTLES: YOU'VE GOT MAIL!

Here is a simple Valentine's Day breakfast and card making morning for your littles! We picked up most of these goodies from Target and Michaels Craft stores- just goes to show you what you can create with store bought items and just a touch of DIY.
Scroll down to the bottom for a DIY on this simple heart ornament.
We used fiber fill for the clouds and used THIS tutorial for the paper airplanes.
Straws, cups, plates, and napkins from Target.
Wooden scoops by US! Convo us on ETSY to purchase!
Michaels Craft store had the banner blank- we just added letters! We rummaged through our craft drawers and found lots of card-making supplies for the kiddos.
Fill mini shipping tubes from Michaels with crafting supplies! 
Download "Special Delivery" labels HERE.
Have your littles decorate mailbags - tutorial HERE.

HEART ORNAMENT TUTORIAL:
First make a heart template: fold a piece of paper in half, cut out half of a heart shape. When you unfold it, it should be a symmetrical heart. Fold colorful paper strips in half, fold your template in half and trace on the folded paper strips. (All of the hearts need to be the same size for this to work). 
 Use double stick tape to put the hearts together back to back. We used 6 or 7 hearts per ornament.
Stop half way through to tape the string in the middle.
Voila!
We hope you and your littles have a SWEET and fun Valentine's Day breakie!

Friday, January 16, 2015

CLASS VALENTINES FOR THE BABIES! (FREE PRINTABLE)

More class valentines for you! 
Max's classmates are all around 12-18 months, so no candy, no small toys aka choking hazards.  Though... I think all the moms would appreciate eating the candy FOR their babies- or is that just me? Maxie's favorite bribe crack snack is Pirates Booty. It's easy to eat for littles, somewhat healthy, gluten free, and we happened to have a massive box of individual bags in our pantry.
This Valentine is a little cheeky...see what I did there? It might be inappropriate for older kids, but I think it'll slide with teeny ones! Scroll down for the link.
Simply print the tags on card stock, cut right on the lines (a paper cutter is the easiest), punch a hole in the corner of both the tag and the corner of the Pirate's Booty bag, and tie with string.

Click HERE for the Pirate's Booty Download.

For the bigger kids, check out our other Valentine's Day free printables. 
Download our previous designs below by clicking on the titles:


-L

Thursday, January 15, 2015

DIY VALENTINE KEEPER


We wanted to create some valentine catchalls for our littles to take to school or simply hang on their door to collect all of the sweet valentines that they get from their friends and family. We wanted to do something a little bit different than the average shoe box that we all know (and love..... or do we?). I may have had too much fun doing this little project.... shhh!

Here is what you will need:
- 2 pieces of felt
- twine
- scissors
- craft glue
-heat bond tape
-iron/ ironing board 
- 1 needle 
- straw (if you are doing one for a boy)
- anything you choose to decorate your bag with! I chose ribbon and felt stickers


Simply lay out your two pieces of felt, cut strips of the heat bonding tape for 3 of the sides as shown and iron over each strip holding for about 6-8 seconds per section. ALLOW TIME FOR IT TO COOL!! Then, pull the paper part off of the tape. If it has not cooled, this part will not work!

 Lay your second piece of felt directly on top of the piece with the tape.
 Iron. Again, be sure and leave the iron on each second long enough for it to actually bond. Patience! 
Allow for cooling time to ensure a good hold. Then, you should have a pocket that looks like this.
  Next, string your twine through the needle, and poke the needle through both pieces of felt. It will be hard to get it through the heat bonding tape, so be sure to poke your hole just outside of the edge of the tape.  tie a double knot to secure the twine.
Do this on both sides.
 Play with your design before securing everything to the felt. Lay it all out just how you want it.
 Then, get to gluing. I only needed to glue the ribbon I used. I used Martha Stewarts craft glue, which worked fabulously.  
 The stickers were felt, and I got them at Target! They adhered to the felt bag extremely well.

If you are doing one for a boy, you can slide a straw onto the twine before you thread each side to create a carrying handle.... kind of like a briefcase. ;)

This is such a fast and super simple project that you can actually do with your kids!! We made a couple more of these bags, and I did the ironing and threading. Then, I just let Amara peel and stick (hence the upside down hearts on hers) as she pleased. Now, go fill this thing up with some V-day goodies!

-J